Thank you to all for your support of the Exchange in 2017 but most of all for just being a great bunch of guys (and the occasional gal). We have much to look forward to in 2018. A Happy New Year to all!
It's a commonplace that edge sharpness worsens from the moment we've deburred it and measured, through the first day, even if the knife doesn't cut anything.
BESS sharpness score of a freshly sharpened edge is always better than that 1-2 hours later, and the worst is in 12-17 hours after sharpening.
It is practically important to know what drop in sharpness comes from oxidation (i.e. increase in BESS reading).
Knowing that, a BESS score worse than what we could explain by oxidation will indicate either presence of a microscopic wire/foil burr that folds to one side of the edge with time, or the edge apex overheating & softening that leads to the apex bending to one side, or both.
I've done a series of tests on stainless steel to quantify this change in sharpness, and found that a completely deburred edge scores by 5 BESS more in 1-2 hours, and by 10 BESS more in 10 hours.
Recently I came across a Japanese study Analysis of oxide layers on stainless steel that has data on chrome-oxide layer/film thickness. This film thickness is temperature-dependent, and also acidity-dependent. I double-checked the common buffing compounds data sheets, their pH is neutral; next week am getting litmus paper to check actual pH of the mix of the honing compound and swarf on my paper wheels.
Initially the chrome-oxide film thickness is 3-5 nm, but if mechanically polished and heated to 400 C degrees, the film thickness reaches 20 nm - isn't that exactly what is happening to the very edge when we deburr it on a felt or paper wheel at high RPM?
This is in line with the BESS score worsening by 5-10 BESS that I observed - BESS edge sharpness testers show edge apex radius in nm, and that extra 5-10 BESS is the 5-10 nm thick chrome-oxide film added to the radius.
Based on my tests, and understanding of the data in that study, I concluded to myself that any worsening of the BESS score up to 20 BESS can be attributed to oxidation; but worse than that shall be attributed to the wire burr or edge apex folding.
First, Mike noted that it takes 6-8 hours for a straightened wire burr to regain its folded position due to metal memory;
Second, complete removal of a wire burr improves BESS reading by 50-60 BESS; and
Third, a stropped edge left for a couple of hours will score 10-15 more - I now attribute this to oxidation chiefly.
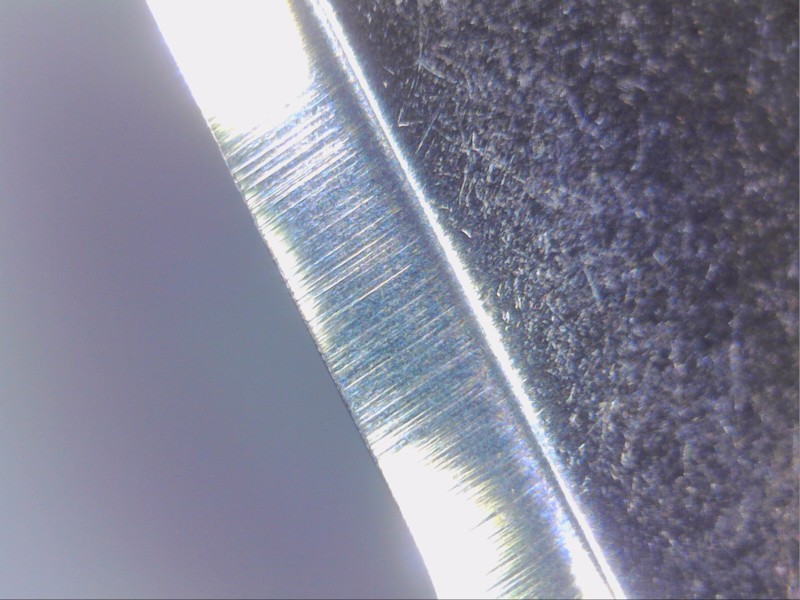
To better understand what I've read, I did another series of tests on an edge that had a near continuous wire burr seen under a microscope - if you strain your eyes really hard, you can see that tiny burr along the edge apex on the photo below.
In 1-2 hours the BESS score worsens by 5-30;
In 10-12 hours by 45-50 BESS.
Practical use of those findings is in detecting a microscopic burr by simply letting a sharpened blade lie idle for 10 hours, and then taking a repeated BESS reading - a score increase by more than 20 BESS is indicative of the burr.
If such a knife is put to use, its cutting performance will quickly drop due to the burr and apex rolling.
To fix this, I take the blade to a paper wheel with a 0.5 micron abrasive and do just one light and quick pass each side at a higher angle (e.g. an edge of 15 dps I hone at 15.4 degrees). After that, the BESS score immediately improves by at least 30-40 BESS, then in 10 hours worsens by 10-15 BESS (oxidation), but then stays unchanged even when checked days later.
Would one of you guys be so kind as to very simplistically explain the process of hardening a blade? I’m talking about just the very basic process.
Am I correct that it is something like, get the blade really hot and cool it quickly. That makes it very hard but brittle. Then get it hot again (do you cool it quickly or slowly this time?) to temper (correct term?) the blade to reduce the hardness/brittleness?
I know there is a LOT more to it, but is that basically the process?
Mark Reich recently suggested that a new topic be started instead of continuing the malleability of burrs topic. I agree with this. Looking at the forum stats of the forum I moderate, the top ten topics by number of replies range from 166 to 87 replies. This many replies is far too many to be efficient. I would be the last to discourage anyone from posting. Long topics tend to meander from topic to topic. I would rather see more topics of around ten to fifteen replies. I think they would be more apt to stay on topic and be a more readable length.
I applaud Mark for making the suggestion. Bessex has much valuable content. Let's keep it well organized.
It doesn't snow here and I don't live near any hills. Somehow, a big snowball is just about to roll into my house. It began with a niece who lives in London. She decided to spend her Christmas vacation in Phoenix as opposed to Kansas City where she was raised and the bulk of her family still reside. When her (the niece's) mother found out about her plans she decided that she and the rest of her brood would come as well. Then my wife's sister in Annapolis learned of the plan. Are you beginning to get the picture? You might think that I'm about to complain about all the people descending on us for Christmas but I'm not. They're good people and I enjoy spending time with them. What I'm complaining about is that i had to clean up my shop and my garage. That used up the better part of two week ends. Now, I'm not even complaining about that. You wouldn't believe all the stuff i found that I thought was gone forever. I found stuff I didn't even know that i owned. Thank goodness people come to visit every once in a while and force me to clean up my act. I'm a much wealthier man for it both in newly discovered personal possessions and in quality time spent with family and friends. I guess, when we really think about it, none of us have too much to complain about... do we?
Merry Christmas and Happy Holidays to everyone on the BESS Exchange and to your families as well.
About a week ago an industrial customer of ours called with, we won't say a complaint, but what we prefer to think of as a "question". The question was this; they'd been testing recently received and brand new cutting tools from their supplier and getting erratic readings on their multiple point edge sharpness tests. Anywhere from 260 to 480 on a single edge that was only 1.5" wide. First a little background though before we go further with this story:
We deal, typically, with process engineers at these companies. Process engineers have to wear many hats. They have to be able to diagnose problems in their 4-20ma current loops and select the right load sensor for a batch blending operation. If their manufacturing facility is also engaged in processes that cut, slice, shear or chop things then they have to contend with issues germane to edges as well. You can't be an expert at everything. That's why we get a lot of calls from those engineers who are experiencing problems relative to product quality, through-put, and/or cost of operation. In this case, the problem turned out to be one that applies to anyone who ever ground an edge so we thought that we would share it here.
So the company engineer agreed to send us a few samples of the new blades they had received from their supplier. The first thing we did was have a nice close look at the edges. Here is an optical microscope picture of the first edge we looked at:
It's easy to see why this edge would produce inconsistent readings. To the left, the edge is a mass of residual burr. To the right the burr is not quite so prevalent. Their edge test results were telling them exactly what the picture shows. This is what edge testing is really all about. Not just how sharp your edge is at the end of a sharpening session but using it as a diagnostic and learning tool. So OK we've all seen pictures of burr before but these edges weren't quite finished telling their story yet. Here's another picture of another blade that came from the same group of samples provided.
Believe it or not, this picture was taken after having been worked over with a leather belt mounted on a Kally. We tested it after deburring with the Kally and it still wasn't sharp so back to the microscope. The edge has been buffed up nicely but essentially, now, the burr side of the edge is a scraper. It looked, sounded and felt like a scraper as well when this side was drug across the surface of a leather hone. The top 75% of the burr has been removed leaving this stubby and substantial base. The shiny, almost weld-like look of the burr is rolled toward you in the picture. That's why it's shiny, it's reflective angle is different than the bevel portion of the edge. Our experience says that burrs like this occur when too much grinding force (or speed) has been used. Our experience also tells us that the only way to remove this burr is to grind it off. Hopefully with less applied force and speed the next time.
We're very open to other theories and interpretations regarding these pictures. We say the top 75% of the burr has been removed but, of course, we don't really know if that percentage is accurate. It's just a guess. We say the only way to remove this kind of burr is to grind it off, well that's our experience. If you see something here that we don't or if you just see it differently. Let's hear about it please.
In closing, industrial operations should represent a real opportunity for professional sharpeners because most industrial users (and very often their edge suppliers) simply do not have the knowledge base that can found right here on the BESS Exchange. How large is this market? Look around the room you happen to be sitting in. It's difficult to pick out an object that wasn't sawn, sheared, sliced or cut in a factory before it became the product you see. Look in the pantry or the cupboard. Those sliced peaches didn't grow that way. We promise, there's a whole world out there beyond just kitchen and carry knives.
I have been posting about "Gen III", converting a Viel belt grinder to variable speed (Gen II) and switching to a smaller Viel drive pulley (Gen III). I am happy to report that I am most pleased with Gen III, and will post full conversion instructions. soon.
Along the way, I became curious about the Kalamazoo 1SM belt grinder. I had no intention of purchasing a second belt grinder; I was just curious. Several bessex friends shared their thoughts with me. I acquired a 1SM "skeleton". A previous owner has purchased it for its legendary Baldor motor. I installed the fixed speed motor I originally used on Gen I with my Viel. The combination worked nicely for a very brief time until my motor shorted out.
I had a second Penn State Industries motor I was planning to use for a sevond Viel conversion. I decided convert my 1SM to variable speed. I probably would not have done this if the original Baldor was still attached to the skeleton. With a dead motor and a spare variable speed motor on hand, it became a no brainer.
I will describe both what I did and what I would do differently. The constraint with the 1SM is the round shaft for the idler pulley. It is welded onto the frame where the PSI motor would ideally be mounted. This means that the motor must either be mounted with spacers to clear the hump or lowered. I intended to mount the motor lowered and butting up against the frame. In a senior moment I decided to try using spacer bushings. These worked, however, I ended up lowering the motor somewhat to clear the platen mounting.
Next time, which will probably never happen for me, I would lower the motor mounting holes and pull the motor up directly against the frame. Using a square, I scribed a vertical line through the center of the existing shaft hole. The hole is one inch; placing the vertical line half an in from the edge is accurate enough. EDIT: Lowering will not work without modifying the round shaft. The shaft has a milled groove to accept the locking screw of the collar. The groove does not extend high enough to lower the motor enough to directly abutt the frame. The groove could be milled to be longer, however, just using the three standoffs seems the practical course. Sorry that I have been too occupied to return to this. I hope to complete the thread soon. The Kally is working very well.
Sorry, this post is incomplete. I can not get the photos to post. I will keep trying.
EDIT: The first attached photo shows how I used the lever which came with the Penn State Industries motor as a drill pattern for the three radial motor mounting bolts. It also shows how I lowered the motor slightly to clear the platen mounting. The lower shaft hole was drilled with a hole saw.
The second attached photo show the hardware I used. The bolts (stainless, although regular bolts would work M6x30) and the heavy steel bushings which hold the motor securely clearing the round shaft.
The third attached photo shows two of the bushings.
The fourth attached photo shows the heads of the three radial motor bolts.
The fifth attached photo shows the motor portion of the Kally.
No mounting plate is required. If someone should ever want to convert back to a fixed speed motor, the conversion places no hinderences.